Basic setup for secure HTTP
IPS Server is initially installed in (insecure) HTTP mode, and Quorum Software recommends the immediate re-configuration to HTTPS (secure HTTP) mode. A trusted certificate (backed by a standard Certificate Authority) or a self-signed certificate may be used. Only trusted certificates should be used in a production deployment.
SSL certificates for IPS Server machines and clients
IPS Server can work with certificates created by an external Certificate Authority (CA) such as GoDaddy, or with self-signed certificates. The latter are not recommended for use in production deployments of IPS Server because they require advanced-level knowledge of secure HTTP.
If all client and server machines are in a single Windows domain, or in mutually-trusted Windows domains, the CA provided by Active Directory can be used.
The certificate file required for installation in a server should be in PFX format (which includes the private key). For installation in a client machine, the 'public' file in CER format is required.
Client machines will automatically connect by secure HTTP if the server machine offers them a trusted certificate that is backed by one of the standard Certificate Authorities. If you install a self-signed certificate in the IPS Server machines (or a certificate from a non-standard CA), then client users will need to install a corresponding SSL client certificate into their machine's certificate store. Likewise, administrators who want to access IPS Manager from a machine other than an IPS Server machine will need to install a SSL client certificate to make a secure connection.
Installing a server certificate
Before starting you must have a certificate file in PFX format. This file will be protected by a password, and you will need to know that password to make the installation (or, you must have the required permission in a Windows domain, if Windows-based authentication has been used).
If the IPS Server is running as a cluster, every server machine will require the same installation process.
It is recommended install the server certificate into the personal ('My') store of the local computer account. You must have the password to access the private key when you import the certificate, and also the private key must be accessible by the IPS service account.
On each IPS Server machine, open an elevated PowerShell and type the command 'certlm.msc' to start the Local Computer Certificate Manager.
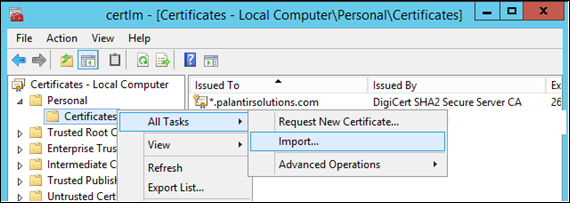
Click on 'Personal' which is the first item in the list 'Certificates - Local Computer'; right click and select menu item 'All Tasks > Import':

Locate the certificate file for import and enter the private key access password when prompted.
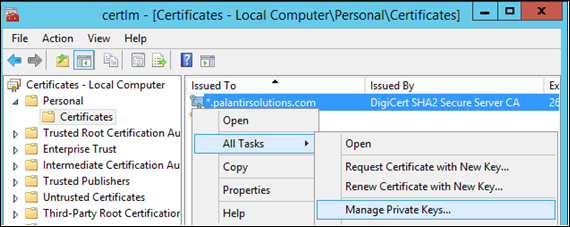
Next, click to highlight the certificate you have just installed; right click and select menu item 'All Tasks > Manage Private Keys'.

Add ‘Read’ permissions for the IPS service account.
In 'certlm', copy the certificate from the 'Personal' category to 'Trusted Root Certification Authorities', so that this machine will be able to run a client browser to access the IPS Manager.
Finally, in an elevated PowerShell, register the 'sslcert' to the HTTPS port (default 443) by entering the command:
netsh http add sslcert ipport=0.0.0.0:443 certhash=90ED69F91350B8681AEAAF4CAE5C243F57360163 appid="{9d0b745f-7421-4372-adff-3e764efd908a}"The value of 'certhash' must be the value of the thumbprint of your own certificate. The 'appid' is a fixed value that refers to the IPS Server program; the quotes around the appid value are essential.
If you need to remove an existing sslcert, use the command:
netsh http delete sslcert ipport=0.0.0.0:443Enabling (or disabling) secure HTTP in IPS Manager
After installing the server certificate, which is assumed to be in the 'Personal' ('My') certificate store, you can configure IPS Server to use HTTPS based on that certificate.
You will also need to register the HTTPS port to the IPS service account. For instructions, see IPS Service configuration.
Enable HTTPS by opening the PalatirIPS Manager. Go to the Services view, 'Endpoint settings', and tick ‘Use https’. Tick 'Use default port', or type in a different port number.
In the section 'Service Certificate', click the 'Browse' button. Choose Store location 'Local Machine' and Store name 'My' then 'Search for Certificates'.
Select the certificate that you have installed.
Click the 'Save all changes' button at the top of the view.
The response box will show the commands needed to register the HTTPS port and the sslcert, if you have not already done so. Also, check that the Windows firewall has an inbound rule for the HTTPS port.
Restart the IPS service on the server machine so that the new settings will take effect.
After restarting, you will need to upload the new license file(s) which are configured for the 'https' server URL.
Note: when HTTPS is enabled, there will be no IPS service present on the HTTP web port so requests using the 'http' address will fail. If you want to create an automatic re-direction to the HTTPS port this can be done using a web server application, such as Windows IIS.
Installing a SSL client certificate
This procedure is not needed for a certificate backed by an external CA, since the default Windows setup includes coverage of all of the major Certificate Authorities. It is also not needed if the Active Directory CA is being used.
To install a self-signed certificate needed for HTTPS connection with the IPS Server, you will need a certificate file in CER format. This is a 'public' file which does not include the private key.
Open an elevated PowerShell and type the command 'certlm.msc' to start the Local Computer Certificate Manager.
Click on ‘Trusted Root Certification Authorities’, right click, and select the menu item ‘All tasks > Import’, browse for the CER file, click Next, and follow the steps.
To test the certificate, open a web browser and connect to the IPS Server address. The connection should appear as 'Secure' (green with the 'locked padlock' icon).
Important: If a trusted SSL client certificate is not present, Planning Space users will get a warning in their browser, however depending on the browser type and configuration they may be allowed to make an insecure connection with the IPS Server.
